
Do you want to give permission to those whom you trust to access your personal PC? We recommend, not to give access to lots of people because you have to keep your data safe so, think twice before giving access to anyone. However, it becomes necessary to hand over Admin permissions to some other users on your PC, especially if the other user is working on the same level as you in the case of an organization and also if some other family member uses your PC at home.
We recommend, not to give access to lots of people because you have to keep your data safe so, think twice before giving access to anyone. However, it becomes necessary to hand over Admin permissions to some other users on your PC, especially if the other user is working on the same level as you in the case of an organization and also if some other family member uses your PC at home. So if you are seeking for ways to change standard user account to Admin account in Windows 10 powered PC, then today we are here with some ways that can help you do the same.
Windows 10 has lots of functionalities and we only know about some of them as we have not explored it deeply, there is an option about which we will guide you today that is How to Change Standard User Account to Admin Account in Windows 10.
How to Change Standard User Account to Admin Account in Windows 10:
Below are some of the different methods you can follow to change standard user account to admin account in Windows 10. Please read and follow the procedures listed below carefully if you don’t want to face any technical difficulties.
Method 1: From the System Settings App
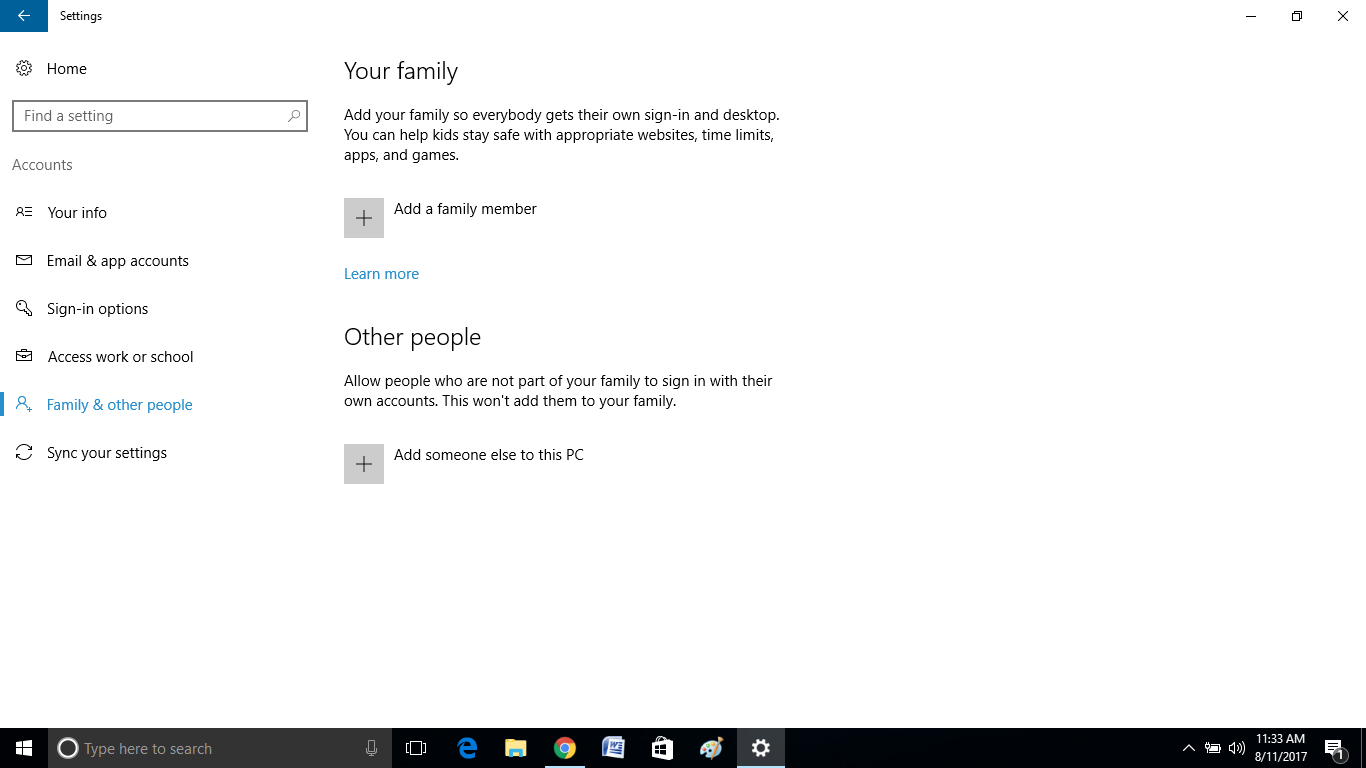
- Open the Settings App. Windows + I is the shortcut method.
- Click on “Accounts”.
- Click on “Family and Other People” Option.

- Click on “User Account” and then click on “Change Account Type”.
- When you will click on change account type, a blue window will open and you will see a drop-down having two options. From that drop-down select “Administrator”.
- Done. Click on “OK”.
Method 2: From Control Panel
Another method for How to Change Standard User Account to Admin in Windows 10 is using the control panel. Let us see the steps which we need to follow.
- Open Control Panel. Open Windows and directly type “Control Panel”.
- Click on the “User Accounts” option.
- Select the user whose account type you wish to change.
- Again select the “Change the account type” option.
- From the two options, select “Standard User” or “Administrator”.
Method 3: From User Accounts
Considered as one of the easiest methods for changing the Standard user to Admin.
- Press Windows Key + R to open the run command. Type “NETPLWIZ”. It will directly open the user account.
- Click on “Properties” Button.
- There will be a tab named “Group Membership”, click on it.
- Choose the one from “Standard User”, “Administrator”.
- Click on “Apply”.
Method 4: Using Command Line
Yet another way of How to Change Standard User Account to Admin Account in Windows 10. Follow the steps carefully.
- Open the command prompt. You can directly write “cmd” in the run command dialogue box.
- Type the command: “net localgroup Administrators “account-name” /add”
- If you want to change it to the standard user, then type the following command: “net localgroup Administrators “account-name”/delete”.
- If you want to check whether it is correct or any problem is there, open command promot and just type “net localgroup Users”.
Final Words:
These are the following ways for How to Change Standard User Account to Admin Account in Windows 10. The same methods you can perform on windows 8.1 and windows 7 too. You can do this process with any of the above-mentioned processes. All of them are very easy, just follow the steps.