
Microsoft undoubtedly made Windows 10 better than the previous version of Windows but one problem which is still bothering lots of Windows 10 users (including me); the boot time. Boot time has been an issue since Windows 7 and there were lots of tricks which lets you decrease the boot time in Windows 7. But Windows 10 is a whole new OS; the UI is different, control center has been partially replaced by Settings menu and interacting with different parts of the Windows.
So, here are some tips and tricks which will let you decrease the boot time of your Windows 10 PC significantly. Just to warn you before going any forward, we would like to inform you that some of the tricks need buying additional hardware. So be prepared to shed some money, let’s get started.
Disable Fast Boot
The Fast Boot feature is in Windows since Windows 7 but it makes things worse for the PC. Well, it sounds promising because of the name “Fast Boot” but in reality, it increases the boot time. So first, you need to do is try disabling this feature and see if it makes any difference.
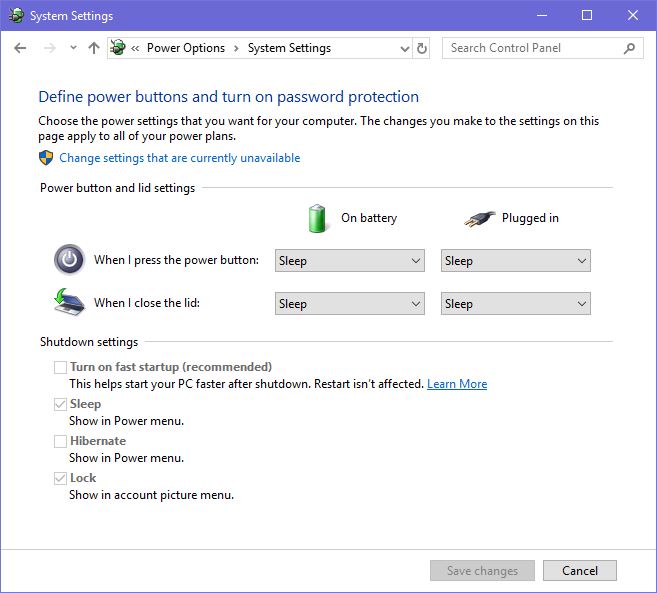
- Hit the Windows button, type in “Power Options” and hit Enter.
- Now click “Additional Power Settings” under “Related Settings” section.
- Now click “Choose what power button does” in the left pane.
- On top of that page click “Change settings that are currently unavailable” (and click “Yes” on UAC).
- Now, untick the “Turn on fast startup” option and click “Save changes”.
Virtual memory
If you think that your PC has enough RAM and still your PC is taking too much time to boot up. Then you should try adjusting the virtual memory, this will create an additional small partition on your hard drive which will work as RAM. This will also make your PC faster that before by disabling some more options.
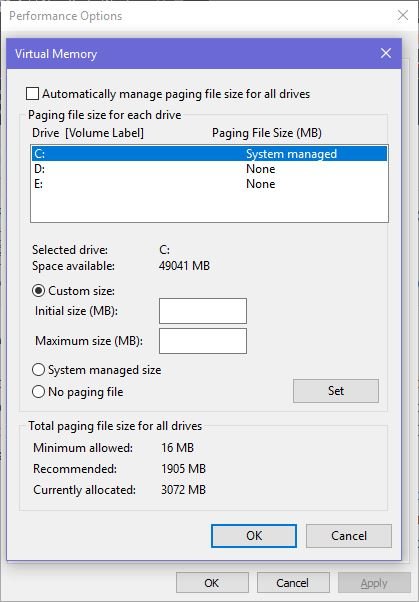
- Open start menu and type “Adjust appearance” and hit Enter.
- Switch to “Advanced” tab and click the “Change” button.
- Uncheck the “Automatically manage paging files” and check the “Custom size” option.
- Now type in the initial size and maximum size and save the settings.
- Reboot your PC once and you will see the changes in the next boot.
Try switching to flash storage
Switching to flash storage means that installing an SSD instead of HDD and install Windows on it. You should buy an SSD for your PC, some laptops are also upgradable to SSDs like Alienware. You can install Windows 10 on newly installed SSD and set that SSD to the top in boot priority options.
Conclusion
These were some tips which you can use to make your Windows 10 PC boot faster than ever. If you are still facing difficulty and don’t want to buy a new SSD for faster boot up then you can try to refresh the Windows 10 installation. If you find something that you find a bit confusing then share it with us in the comment section.