
With the insurgence of Cloud computing and storage, Microsoft has made the OneDrive core part of Windows 10 operating system. OneDrive is directly integrated right into the File Explorer of Windows 10 and it could be annoying for the users who are using other Cloud Storage services like Google Drive, Dropbox, etc.
This deep integration of OneDrive acts weirdly in a lot of situations, sometimes it gets annoying when you start working on MS Word or Excel and the file you are working on gets saved in that folder. Or sometimes while syncing the folder, it uses up the maximum bandwidth of the internet connection and slows down the internet. Also, there is no option to uninstall it from “Control Panel.” So here are some methods that you can use to uninstall OneDrive completely from Windows 10.
Method 1: Command Prompt
All you have to do is execute some commands in the command prompt and the OneDrive will be uninstalled in not time.
- To open a command prompt in administrator mode, you have to the right-click the Start button (Windows icon) and select “Command Prompt (admin).”
- First type “taskkill /f /im OneDrive.exe” and press Enter, this will eliminate all the processes related to OneDrive.
- Now type one of the following commands according to the version of your Windows 10:
For 32 bit version: %SystemRoot%\System32\OneDriveSetup.exe /uninstall
For 64 but version: %SystemRoot%\SysWOW64\OneDriveSetup.exe /uninstall
There will be no confirmation message or progress bar to confirm the operation; only there will be no errors while doing this.
Method 2: Using Group Policy Editor
Group policy editor is an advanced tool so while performing this fix, try to follow the steps. The OS might get nonoperational if you modified any sensitive setting.
- Open Run command “Win+R” and type gpedit.msc and press Enter.
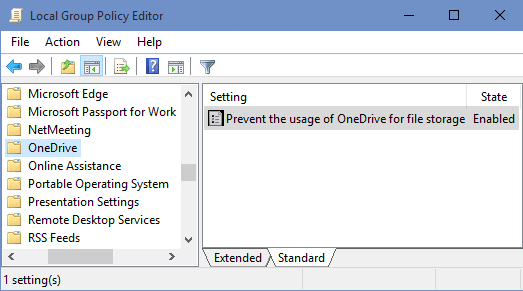
- A group Policy Editor window will open.
- Click on the Administrative Templates folder and double click the Windows Components folder.
- Double click the OneDrive folder then double click on Prevent the usage of OneDrive for file storage.

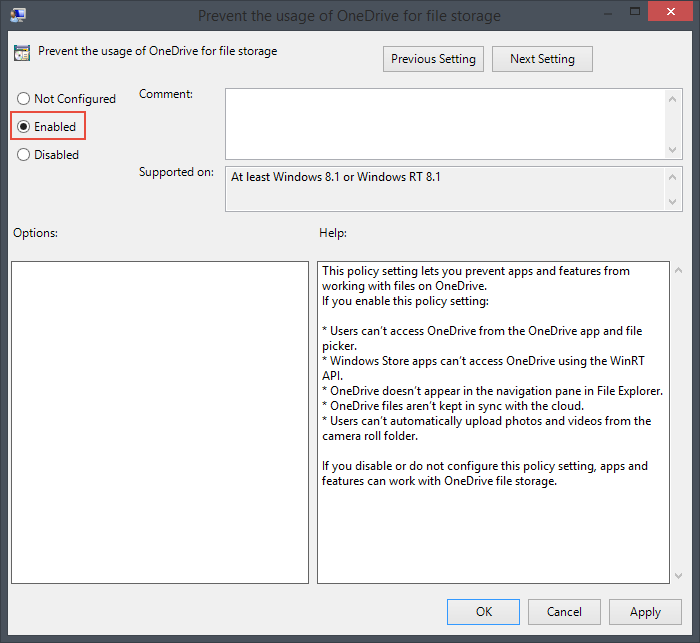
- Select the Enable options and click OK to save the setting.

Conclusion
Now, you won’t be able to see the OneDrive folder in file explorer or all apps menu. The second method is the best because you can always revert the setting to get the OneDrive working again (if you want). If there is anything you can’t understand in this guide, then do share us your thoughts in the comments section.