

Windows users regularly complain about the high CPU usage by Audiodg.exe process on their computer. As the Audiodg.exe process isn’t a familiar one, many people assume that it is a computer virus.
So, if you too are facing the issue with the Audiodg.exe process taking too much of your CPU resources, then today we are here with a well-explained tutorial on how you can fix the issue in different methods.
Is Audiodg.exe A Computer Virus?
Let us begin by explaining the most common question regarding the Audiodg.exe process that most users have.
Is it a computer virus?
NO!
Audiodg.exe is not a computer virus. In fact, it is a default process run within the Windows operating system.
This means that the process exists from the very beginning of your Windows 10 operating system. The only reason you are noticing it now might be because of the high CPU usage issue that the process is causing on your computer.
So, What is Audiodg.exe?
Audio Device Graph Isolation, commonly known as Audiodg.exe (as its process name) is a feature that is part of the Windows Audio Engine.
Basically speaking, this feature allows third-party applications running on your Windows 10 operating system to access and operate the sound features of your computer.
Even though we have explained the function of Audiodg.exe in a simple way in the above sentence, the importance of the process is very much understandable.
What Causes High CPU Usage by Audiodg.exe?
If the Audiodg.exe process is a default Windows process, then what causes it to consume more CPU than other processes?
Well, if it’s a default process, then it should be well-optimized to consume fewer CPU resources, right?
There are different reasons as to why Audio.dg is consuming more CPU resources than usual, and we have mentioned some common reasons below:
- Enabling Audio Effects: If Audio Effects are enabled on your PC, then that could be the reason why Audiodg.exe is consuming high CPU resources on your computer.
- Incompatible Audio Drivers: High CPU usage by the Audio Device Graph Isolation process on your computer could also be a result of incompatible or outdated audio drivers installed on your PC.
- Higher Audio Sample Rate Configuration: If the audio sample rate on your computer is set to a higher value than what is optimal for your computer hardware, that could also be the reason for the issue that you are facing.
Methods to Fix High CPU Usage by Audiodg.exe in Windows 10?
Now that you know about the common reasons for the high CPU usage by Audiodg.exe process issue on Windows, below are some of the easiest ways to fix it.
Method 1: Run the Audio Troubleshooter Wizard
- Press the “R” key + Windows key on your keyboard to bring up the Run menu.
- Within the Run window, type the command “msdt.exe -id DeviceDiagnostic” (excluding the quotes) and press the “Ok” button.

- The Audio Troubleshooter wizard will now be launched on your computer.
- Go through the instructions on-screen. The wizard will find and fix any issues with the audio hardware and software on your computer.
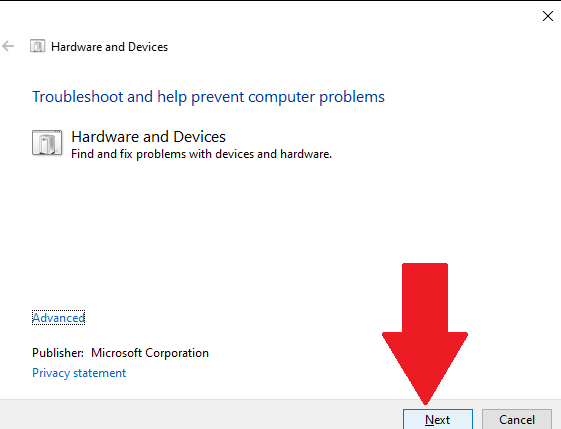
Once the troubleshooting completes, launch the task manager and check whether the CPU consumption by Audiodg.exe has reduced or not.
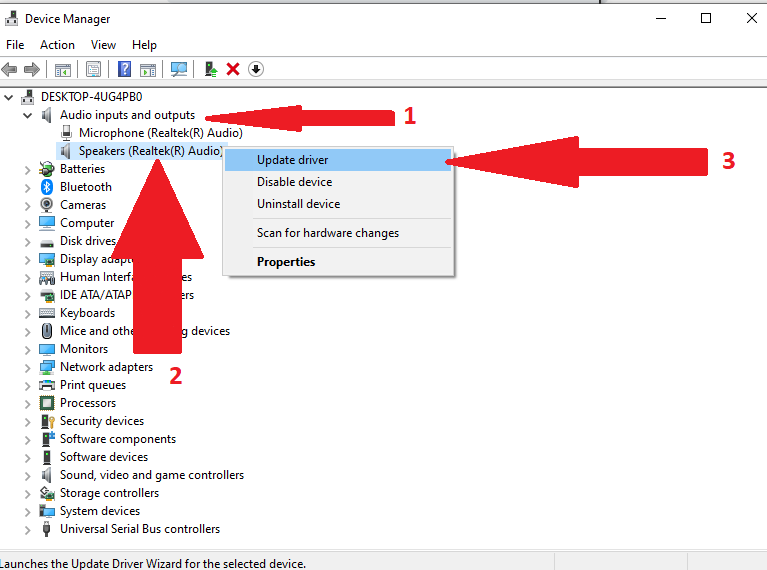
Method 2: Update Audio Drivers in Windows 10
- Launch the Run window.
- Type the command “devmgmt.msc” (without the quotes) and press on “Ok”.
- When the Device Manager window launches, expand the “Audio inputs and outputs” option.

- Now, click on the speaker indicated within this subsection.
- Right-click on your mouse and select “Update Drivers” from the drop-down menu that appears.
Method 3: Change Audio Sample Rate in Windows 10
- Launch the Run window, type “control” (without the quotes), and press “Ok”.
- From the Control Panel window that launches, click on “Sound”.
- Now, click on the “Speakers” option.

- In the new window that appears, switch to the “Advanced” tab.
- Within the Advanced section, change the audio sample rate of your Windows 10 computer.
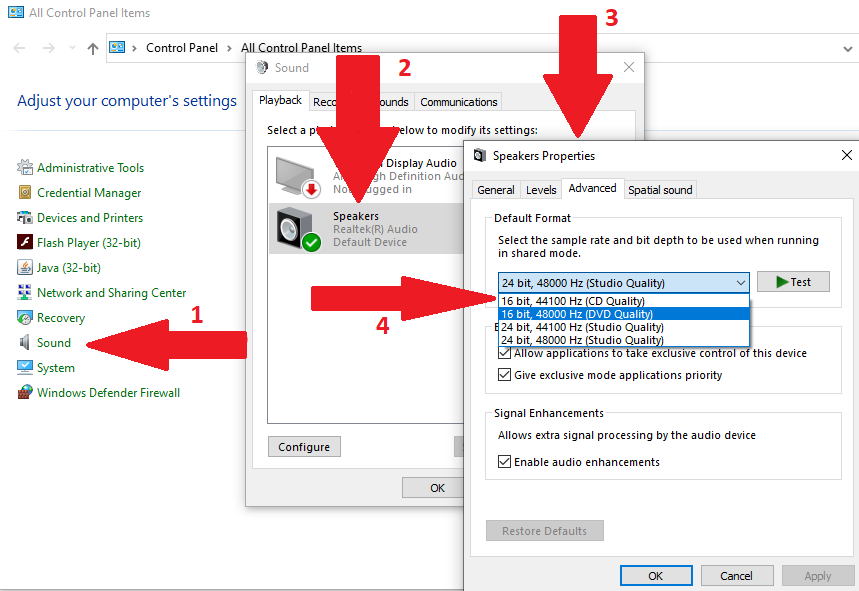
You can try switching between the different audio sample rates you can see and check whether the CPU consumption by Audiodg.exe decreases or not.
Final Words
In the above article, we have tried to explain the Audiodg.exe process, what causes the process to consume high CPU in Windows, and the different methods you can follow to reduce the CPU usage by Audiodg.exe in Windows 10.
We hope you found this article helpful. In case of any questions, do get in touch with us by leaving a comment below.