
If you are using a Windows 10 powered device, then there is a feature within the Windows 10 operating system that displays you with the data on network usage on the current PC for the previous 30-days. The network usage data is differentiated between WIFI and Ethernet and also by applications so that you can have a look onto which application consumes the most data on your Windows 10 device. See, how you can reset data usage on your Windows 10 device.
If for some reason you wish to reset data usage stats on your Windows 10 PC or Laptop and if you are searching for tools to reset Network Data usage in Windows 10, then today we are here with a few different ways by which you can reset network data usage in Windows 10.
Method 1 to reset data usage
- To reset the network usage data on your Windows 10 machine, launch the “Settings” app on your Windows 10 laptop or PC.
- When the Settings app window appears, click on the option that says “Network and the Internet”.
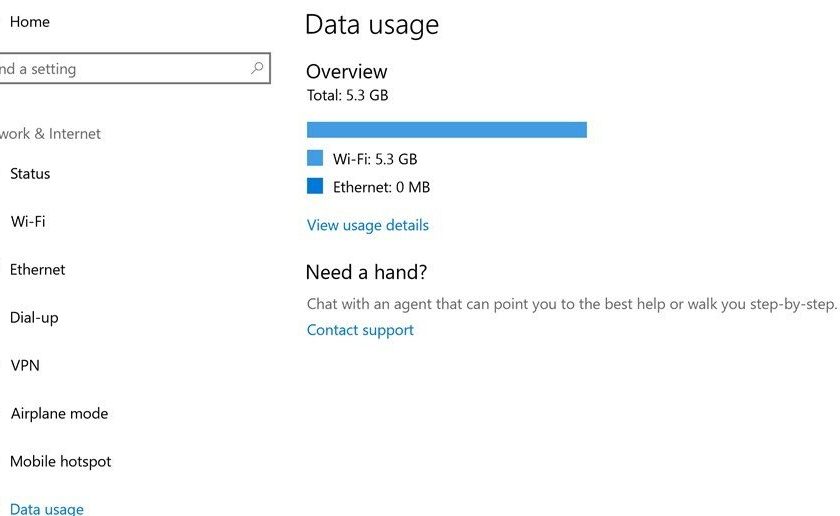
- From the page that opens up, click on the “Data Usage” option.
- When the Data Usage page loads up, click on the option that says “View Usage Details.”
- Now, a new page will load up displaying all the network usage data for the past 30 days.
- Select either WIFI or Ethernet from the drop-down box under the “Show Usage From” option and then click on the “Reset Usage Stats” button to reset the network usage data.
That is it! depending on what you selected, either your WIFI or Ethernet network usage data will now be reset.
Method 2 to reset data usage
- First of all, disconnect all your active internet connection including Ethernet and WIFI connections.
- Close all the web browser windows that you have opened before.
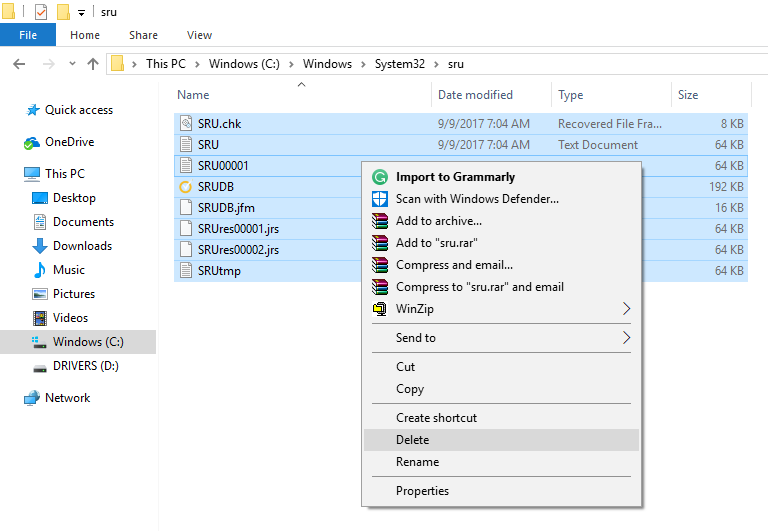
- Now, open the “My Computer” (also known as “This PC”) app on your Windows 10 PC or Laptop.
- Go to the location C:>Windows>System32>sru.
- Open the “sru” folder by following the above path and delete all the files inside the sru folder. But be sure that you do not delete the sru folder itself.
- Once the contents of the sru folder have been removed, your network usage data is reset, and now you can connect back to the internet either via WIFI or Ethernet and start using your applications.
Method 3 to reset data usage
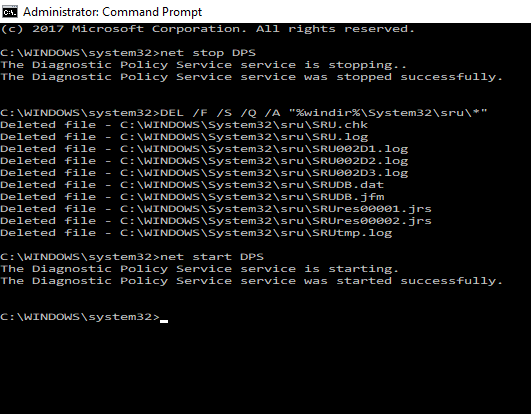
- Open the Command Prompt as Administrator on your Windows 10 PC or Laptop.
- Type in the command “net stop DPS” and press Enter.
- Now, type in the command “DEL /F /S /Q /A “%windir%\System32\sru\*”” and press Enter.
- Finally, type in the command “net start DPS” and press Enter.
And now, the network usage data on your Windows 10 Laptop or PC have been successfully reset.
Conclusion
The different methods mentioned above in the article are some of the easiest ways to reset network usage data on Windows 10 powered systems. Hope you found the guide above helpful and easy to follow as well. In case you have any doubts on how to reset network usage data on Windows 10 systems, then do leave a comment below with your questions and we will get back to you with the best answers.