

Are you facing the Klif.sys Blue Screen of Death [Klif.sys BSOD] error on your Windows 10 computer?
The Klif.sys Blue Screen error is a common issue faced by Windows users.
For anyone seeking a quick and easy fix for the Klif.sys BSOD error on Windows, today we are here with a detailed step-by-step guide on the same.
What Happens with Klif.sys Blue Screen Error?
With the Klif.sys Blue Screen of Death error, your computer screen suddenly freezes and the entire screen turns blue.
Once the blue screen, also known as the Blue Screen of Death, appears, you cannot perform any other task.
Also, an error code with the text “Klif.sys” appears on the screen.
What Causes the Klif.sys Blue Screen of Death [Klif.sys BSOD] Error on Windows?
Well, to put it simply, if you have the Kaspersky Antivirus software installed on your computer, then that is the reason why you’re facing the Klif.sys BSOD error.
Kaspersky Antivirus is a very commonly opted and popular choice when it comes to protecting your computer from malware and other threats.
Millions of people use Kaspersky on their computers.
There is a process named “Klif.sys” that runs when the Kaspersky Antivirus is installed on your computer.
The Klif.sys process stands for “Kaspersky Lab Intruder Filter”, which helps in protecting your computer from malicious attacks and hackers.
Well, not all the users who have Kaspersky Antivirus software installed on their computers face this error.
However, when the process has a conflict with other third-party or system processes running on your computer, then you receive the Klif.sys Blue Screen error.
Ways to Fix Klif.sys Blue Screen Error on Windows 10
Below are some of the easiest ways to fix the Klif.sys BSOD error on Windows 10 computers.
Method 1: Delete the Klif.sys File
The easiest way to fix the BSOD error related to the Klif.sys file is to delete it. Below is how to delete Klif.sys file easily on Windows 10:
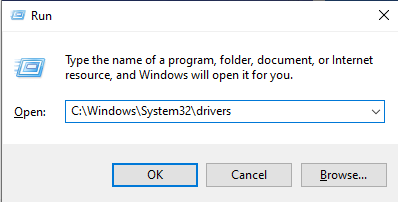
- Press the “Windows” + “R” key on your keyboard.

- In the Run window that appears, type in the command as shown below
C:\Windows\System32\drivers
- Within the location specified above, delete the file with the filename and extension “klif.sys”.
- Also, delete the “klif.sys” from the below location
C:\Windows\System32\DriverStore
- Restart your computer.
And that’s it. You have deleted the Klif.sys file on your computer.
Method 2: Perform a System Restore
If you’ve been facing the Klif.sys error after a recent Windows update, then the best way to resolve the issue is to restore the Windows OS on your computer to a version before the update.
To do this, you need to have a system restore point before the update. If you’ve either set auto-backup or created a manual backup of the Windows OS on your computer before the backup, find the backup and restore the same.
Method 3: Delete the Kaspersky Antivirus Software
If none of the above methods work, then the next best way to ensure that you don’t face the Klif.sys error again is by uninstalling the Kaspersky Antivirus software itself from your computer.
Removing the Kaspersky Antivirus software will definitely completely remove the Klif.sys error that you’re facing.
Final Words
Did you find this article informative? Then do subscribe to Windows Lifestyle for more easy-to-follow Windows articles like this one.